Friday, March 1, 2019

Send Actionable Message Card to Microsoft Teams From Microsoft Flow

Microsoft Teams is an unified communications platform that combines persistent workplace chat, video meetings, file storage (including collaboration on files), and application integration.

Microsoft Flow is cloud-based service that allows business users to create and automate workflows and tasks across multiple applications and services. Currently Flow has a built-in Teams connector, and it does a decent job which allows Flow instances to post messages into Teams channels. However, the connector currently only supports plain text messages, and they look like coming from the authors of Flow instances. 

There is a way to post richer information to Teams through incoming webhook.

Teams Incoming webhook is a URL provided by Teams for any service to post content with the goal of sharing that content in your team's channel. When you configure it, you get a URL which represent an endpoint accepting JSON message. 

In the following example, I am going to show a simple Flow definition which contains one trigger and one action. On manual triggering, an actionable rich message card will be posed to a Teams channel. 

Step 1 Create an Incoming webhook in a Teams channel


Name the webhook "SPWorkflowRichMsgCard" (the name can usually be an application or service which all members in the team understand)


Copy the Url of the webhook, and save it for later use


Step 2 Create the Flow definition with a manual trigger and a Http action


In Http action, switch "Method" to "POST", update Url to the Webhook Url saved above, add one header with key as "Content-Type" and value as "application/json", and also paste following JSON snippet into the text editor (Be aware of escaping "@" with "@@")

{
  "@@context": "https://schema.org/extensions",
  "@@type": "MessageCard",
  "themeColor": "0072C6",
  "title": "Sample Feedback Card",
  "text": "Tell us how you like Actionable Messages. Click **Learn More** to learn more about Actionable Messages!",
  "potentialAction": [
    {
      "@@type": "ActionCard",
      "name": "Send Feedback",
      "inputs": [
        {
          "@@type": "TextInput",
          "id": "feedback",
          "isMultiline": true,
          "title": "Let us know what you think about Actionable Messages"
        }
      ],
      "actions": [
        {
          "@@type": "HttpPOST",
          "name": "Send Feedback",
          "isPrimary": true,
          "target": "http://..."
        }
      ]
    },
    {
      "@@type": "OpenUri",
      "name": "Learn More",
      "targets": [
        {
          "os": "default",
          "uri": "https://docs.microsoft.com/outlook/actionable-messages"
        }
      ]
    }
  ]
}


Test the Flow


Open the Teams channel, there should be a rich message card posed by "SPWorkflowRichMsgCard", and it's ACTIONABLE!


Hopefully it's helpful...

Thursday, February 28, 2019

Send Actionable Message Card to Microsoft Teams From SharePoint Workflows

Traditionally, SharePoint designer workflows help organizations to adhere to consistent business processes, and they also improve organizational efficiency and productivity by managing the tasks and steps involved in business processes.

As Microsoft is moving the enterprise collaboration ecosystem from on-premises to the cloud, many new cloud services created in the cloud are separated from the existed business processes leveraging the old fashion SharePoint workflows. 

To bridge the gap of business process automation between on-premises and the cloud, Microsoft put Flow as the successor of SharePoint workflow. However, due to the heavy investment made in SharePoint designer workflows, it might take a long time to make the switch. 

In the meantime, it's possible to take advantage of the new services in the cloud from the existing SharePoint workflows. I am going to show a simple example of sending an actionable message card to a Microsoft Teams channel from a SharePoint workflow. 

Step 1 Create an Incoming Webhook in a Teams channel


Name the webhook "SPWorkflowRichMsgCard" (the name can usually be an application or service which all members in the team can understand)


Copy the Url of the webhook, and save it for later use


Step 2 Create a simple workflow


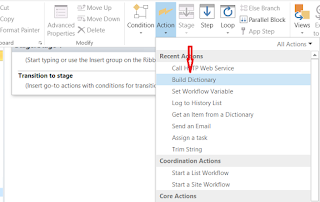
Add "Build Dictionary" action
Name the dictionary "RequestHeader". (Note: value of "Authorization" is empty string)
Fill "RequestHeader" with http header info


Add "Set Workflow Variable" Action


Name the variable "TempRequestBody", and set it as String
Open text builder
Paste following JSON snippet into the text editor, and save it
{
  "@context": "https://schema.org/extensions",
  "@type": "MessageCard",
  "themeColor": "0072C6",
  "title": "Sample Feedback Card",
  "text": "Tell us how you like Actionable Messages. Click **Learn More** to learn more about Actionable Messages!",
  "potentialAction": [
    {
      "@type": "ActionCard",
      "name": "Send Feedback",
      "inputs": [
        {
          "@type": "TextInput",
          "id": "feedback",
          "isMultiline": true,
          "title": "Let us know what you think about Actionable Messages"
        }
      ],
      "actions": [
        {
          "@type": "HttpPOST",
          "name": "Send Feedback",
          "isPrimary": true,
          "target": "http://..."
        }
      ]
    },
    {
      "@type": "OpenUri",
      "name": "Learn More",
      "targets": [
        {
          "os": "default",
          "uri": "https://docs.microsoft.com/outlook/actionable-messages"
        }
      ]
    }
  ]
}


Add another "Set Workflow Variable" action, name it "RequestBody", and set it as Dictionary, Open workflow lookup window


Set "Data source" as "Workflow Variables and Parameters", "Field from source" as "Variable: TempRequestBody" (the String variable defined above)


Add "Call Http Web Service" action


Update the Url of the service with the webhook Url saved above


Update the properties of the "Call Http Web Service" action


Update the value of "RquestHeaders" with variable "RequestHeader"


Update the value of "RquestContent" with variable "RequestBody", and save the changes


Add workflow end stage, then save and publish the workflow


Step 3 Test it

Trigger a workflow instance


Open the Teams channel, there should be a rich message card posed by "SPWorkflowRichMsgCard", and it's ACTIONABLE!


Hope it's helpful...

Thursday, June 22, 2017

Office 365 Web Resources

Office 365 Enterprise seems to be a comprehensive guide for Office 365 enterprise integration.

Microsoft 365 RoadMap seems to be a good place to see what new are coming.

Sunday, June 18, 2017

My initial understanding of Ethereum


After attending a Blockchain session in a tech event of the company I work for, I realized that Blockchain can bring a major change not just for business transactions, information technology, but the structure of our society, so I decided to do some reading.

It turns that Bitcoin really just represents the first generation of Blockchain. It is essentially a distributed application, besides facilitating transactions, it does have hard time to provide other values. Ethereum arguably became the best implementation of the seconde generation of Blockchain, and it provides easier ways to build smart contracts which are computer code that can facilitate the exchange of money, content, property, shares, or anything of value.

Here is a beginner guide for Enthereum, and another tutorial

Here is a hedge fund lives in Enthereum

Here is a guide to build Ethereum smart contract with visual studio

Regarding to current trend of Blockchain, it seems that one of focuses is performance, Dfinity is very interesting startup in this area.

I will keep updating the post while I read more about Blocchain and Ethereum

Friday, June 2, 2017

Set up hybrid search with cloud search service application in SharePoint 2016

I followed this TechNet article, and did a quick test of cloud search service application on my SP2016 dev VM and my MSDN office 365 tenant.

Below are the steps.
  1. Go to GoDaddy and bought a domain, say "abcd.com"
  2. Go to Office 365 admin center, add "abcd.com" by following this support article
  3. Update domains for all users in Office 365 tenant
  4. On the AD domain controller which the SP2016 dev VM connects to, create a domain with the same name "abcd.com", and create same users as Office 365 tenant including the login user
  5. Install AzureAD Connect on the AD domain controller by following this doc, then kick of an express sync
  6. Make sure SharePoint 2016 is healthy
  7. On SharePoint 2016 server, Microsoft Online Services Sign-In Assistant for IT Professionals RTW and Azure Active Directory Module for Windows PowerShell
  8. Download Cloud_Hybrid_Search_Scripts.zip from MS Download Center 
  9. Provision cloud search service application. Open PowerShell console, and run .\CreateCloudSSA.ps1 -SearchServerName "{Search Server Name}" -SearchServiceAccount "{Domain\ServiceAccount}" -SearchServiceAppName "{Name of SSA}" -DatabaseServerName "{Name of SQL Server}"
  10. On board cloud SSA to Office 365 tenant. Open PowerShell console, and run .\OnBoard-CloudHybridSearch.ps1 -PortalUrl "{SharePoint Online tenant root Url}" -CloudSsaId "{cloud SSA application id}" -Credential {PSCredential object for Office 365 login account (usually global admin account)}
  11. Create a content source in SharePoint 2016 with local web application urls as start addresses, then kick off a full crawl
  12. Create a new search center, and associate it to cloud SSA
  13. In SharePoint central admin, open cloud SSA, and click "Result Source", then click "New Result Source", on "Add Result Source" page, do following. Make it default result source.
  • In the General Information section, in the Name text box, type a name for the new result source—for example, Office 365 search index.
  • In the Protocol section, select Remote SharePoint.
  • In the Remote Service URL section, type the address of the root site collection inSharePoint Online that you want to get search results from, such as https://adventure-works.sharepoint.com.
  • In the Type section, select SharePoint Search Results.
  • In the Query Transform section, keep the default setting.
  • In the Credentials Information section, select Default Authentication.
  • Click OK to save the new result source.
Now, if I go to my Office 365 SharePoint online search center, or my on-premises search center, I can see same search result. 

Friday, January 6, 2017

Remove orphaned timer job instances in SharePoint

After removing a server from a SharePoint farm, and putting it back, if you go to Central Admin > Monitoring > Check job status, sometimes, you can find a few jobs running without associated servers, and they usually stuck between 0% to 100%.  
If so, these timer jobs were running on the server which got removed from the farm and for some reason these jobs became orphaned.
If you try to search for solutions on internet, you would end up solutions like:
  1) Stop the timer Services on all servers
  2) Clean up SharePoint configuration cache
  3) Start the timer services on all servers
  4) Recycle the Admin Services on all servers
  5) IIS reset on all servers
  6) Reboot all servers
  7) This post suggests to run following script. 
      $job = Get-SPTimerJob  | where { $_.Name  -eq  "job-delete-job-history" }
      $job.DaysToKeepHistory = 0
      $job.RunNow()
But none of them works for us. After some struggling, and with some help from my colleague Rob Braun, I figured out a way to do it. The following script can be run on a sever of the farm with orphaned timer job instances, and it will clean up the orphaned ones. In my case, the job definition of the orphaned job instance was "Site Lookup Refresh" with internal name "job-sitelookup-refresh".
Add-PSSnapin "Microsoft.SharePoint.PowerShell"
$asm = [Reflection.Assembly]::LoadFile("C:\Program Files\Common Files\microsoft shared\Web Server Extensions\16\ISAPI\Microsoft.SharePoint.dll")
$asmType = $asm.GetType("Microsoft.SharePoint.Administration.SPTimerStore")
# Only need one instance for static mehtod
$instance = $asmType::Default
$jobDefinition = get-sptimerjob | where-object {$_.Name -eq "job-sitelookup-refresh"}
$types = @()
$jobDefinitionType = $jobDefinition.GetType()
$types += $jobDefinitionType
$deleteRunningJobs = $asmType.GetMethod("DeleteRunningJobs", [System.Reflection.BindingFlags]::Static -bor [System.Reflection.BindingFlags]::NonPublic, $Null, $types, $Null)
$deleteRunningJobs.Invoke($instance, $jobDefinition)
As you can see, .Net reflector can invoke internal methods to address problems which simply can't be resolved through SP PowerShell commandlets. Be sure reviewing the code thoroughly through ILSPY or other decompilers, since reflector can be a double-edge sword if the side effects are not well understood.